


PART ONE - LIMITING YOUR PITCH CHOICES
First, a bit of heresy:To begin learning how to improvise you do NOT need to know the infamous and highly overused "blues scale". In fact, to get started you don't need to know ANY scales or chords or songs. All you need is your instrument, a simple play-along track (or your personal on-call rhythm section) and a willingness to jump in. If you're ready to take the plunge, read on.
THE SINGLE NOTE GAME
Learning to improvise can seem overwhelming because there are so many choices - so many possible notes, rhythms, harmonies, articulations etc etc. It's like being given a brand new box of 64 Crayola crayons. How do you decide which one to pick? If you're anything like me, choosing one crayon to start drawing with could be a paralyzing decision. So we're going to make things easier by setting up some strict limits. You'll only get one crayon (note, I mean) to start with.
Which one note should you use? We need to know what the context is before we make that choice. Jazz is primarily a collaborative art, so it is the interaction between you as the soloist and the rhythm section (as your accompanists) that makes the music happen (or not).
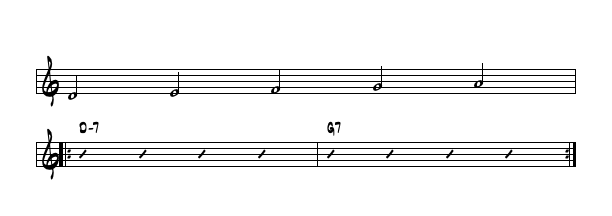
I'm going to make the assumption that you don't have a house rhythm section at your beck and call. It's best if you CAN work with other live humans, but that's not always practical. That's why we use backing tracks. So let's pick a track that alternates between just two chords - D-7 and G7, the sequence we call two - five (ii / V) in the key of C. Don't worry about any of these terms for now. All you need to know is that the piano, bass and drums will be playing one bar (4 beats) of D-7 followed by one bar of G7, ad infinitum. Here's a list of notes that will sound nice and friendly in the context of both chords:
D E F G A
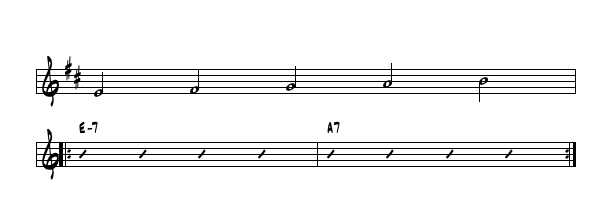
E F# G A B
B C# D E F#

ii V in C
Procedure for playing THE SINGLE NOTE GAME:
- Try out each of the "safe" notes from the list for 30 seconds or so and find one that you prefer. You can just play long tones - whole notes and half notes - for this. Try each pitch in more than one octave if you can.
- Play the note you've chosen in the context of each of the chord changes; really absorb how that particular pitch "sits" in the harmony. Again, you may use long tones for this (so you don't have to make any rhythmic choices).
- Start to play your note with deliberate, specific rhythms (use some of the suggestions below if you like). Use some space! Make sure to breathe, even if you're not playing a wind or brass instrument, as breathing helps you to learn how to play in phrases (more on this later). Most importantly, only play when your inner ear tells you to do so. Don't ever play mechanically or just to "fill up the empty space". Your rhythm section will keep the groove going - so you don't have to make noise every second.
- Try to find a balance between repeating the same rhythm and moving from one to another. In general, music that is too predictable (ie has too much repetition) can get boring in a hurry. Conversely, music that keeps changing without establishing some kind(s) of patterns (and, hence, a feeling of expectation) can seem disordered or chaotic. When you're using just one pitch you can also work on balancing some of the other variables (in addition to rhythm), like dynamics (shades of loud and soft), articulation (note length, accents, slurring or separating) and density (playing vs stopping).
- Start paying attention to phrasing with the rhythm section. They're playing a repeating two-bar pattern, but you can also think of it in multiples, ie 4 or 8 bars. Experiment with beginning and ending your "statement" in these different phrase lengths. Do this by literally playing for 2, 4 or 8 measures then stopping for the same (or a different) number of measures. Then begin again.
*We'll use the term "horn" to stand for any instrument, since this method works for everyone. Here's a little "one note inspiration" courtesy of Tom Jobim, Stan Getz and Charlie Byrd:
WHEN YOU'RE READY, TAKE TWO
Take another look at our original set of notes: D E F G APlay each note, alternating with the D (D-E, D-F, etc). Listen to the variety of intervals* and notice how each successive note is further away (pitch-wise) from the D.
Choose two notes from the list. You can keep the one you've gotten used to working with and add another that sounds good to you in relation to your first pick. Or choose two fresh notes. It's your choice.
Go through the list of directions #2-5 above, now using both notes to create your musical phrases. Don't skip #2; you must really be able to HEAR each pitch in relation to each of the chord changes. Since all of the notes in our list are "safe" (ie, sound consonant in the context of the present harmonies), experiment with ordering your two notes. Which note does your ear tell you should come first? Does that change depending on which chord the rhythm section is playing at the time? LISTEN. Only play what your ear commands you to play. Get comfortable with some silence.
*An interval is the distance between two notes. Carpenters use inches, musicians use intervals.
TAKE TWO, PART TWO
Now it's time for something daring. Let's keep the two notes you've been playing for awhile. But now we're going to have you pick a couple of new notes that are a half step away (above or below) each of your two safe notes. (I'll give the list in a moment). The new pitches will be "unsafe" - if you play them by themselves they will sound sour (ie dissonant) in relation to the chords underneath. That's why we're going to use them WITH the "safe" notes they're right next to. We're going to use the dissonant notes to embellish, to create some tension, to add a little chili powder into the musical stew.Here's the list of unfriendly notes that relate to our original nice set of notes:
- C# or Eb with D
- D# with E (the F is still a "nice" note)
- Gb with F (the E is still "safe")
- F# or Ab with G
- G# or Bb with A

Should you play the main note first or second? Does it sound best to play the dissonant note on a strong or weak beat of the measure? Should you play the embellishing tone long or short? Maybe slur it into the consonant note? Get a feel for using a variety of techniques that sound right to you.

DA CAPO (BACK TO THE TOP)
Now that you've gone through these experiments with your first choices of notes I want you to go through it (just as carefully) with the other possible notes. As you do this, you will find that each time you go through the regimen it will be increasingly easy for you to HEAR BEFORE YOU PLAY. That is the ultimate goal here. Always insist on your ear guiding you. Music happens in the aural sphere, not on paper or in the intellect (although we use our eyes and brain in the learning process).This should keep you busy for awhile. Weeks? Months? It's up to you. And, oh yeah, I almost forgot: You'll want to do this in the other 11 keys. Recall that we've only been playing with this ii/V chord progression in the key of C. Out there in the real world, this sequence of chords occurs in any and all of the other keys.
The concepts are all the same, but each key will have it's own unique feel on your instrument. I guarantee you that each key will get successively easier because you are training your ear as you do this. The skills and good habits that you ingrain with these simple one and two note exercises will be the powerful basis for developing your jazz vocabulary as you move forward.
You can purchase backing tracks for the ii/V chord progression in All 12 Keys HERE.
If you prefer playing with straight 8th and 16th note grooves, pick up Contempo Trax HERE.
Most importantly, have fun with this! There's a reason why it's called PLAYING music!
GO to PART 2 → → →
← ← ← GO BACK to the INTRO
GO HERE to find out about taking private improv lessons. Donate to PlayJazzNow! Yes, this is a business. But we have had people ask what they could do to help us keep the site growing (beyond buying some tracks and spreading the word about our products). If you feel the urge, throw us a few bucks. Thanks!
DONATE (You set the amount, of course)


29 Responses to Beginner’s Guide To Improv – Part 1
Pingback: Class #8 Monday | Crashing Cymbals